> ## Documentation Index
> Fetch the complete documentation index at: https://devdocs.paywithatoa.co.uk/llms.txt
> Use this file to discover all available pages before exploring further.
# Atoa Flutter SDK for Mobile Payments
> Add Atoa Pay by Bank and card payments to your Flutter app. Install the SDK, start a payment and handle the result, with code samples.
## About the Flutter SDK
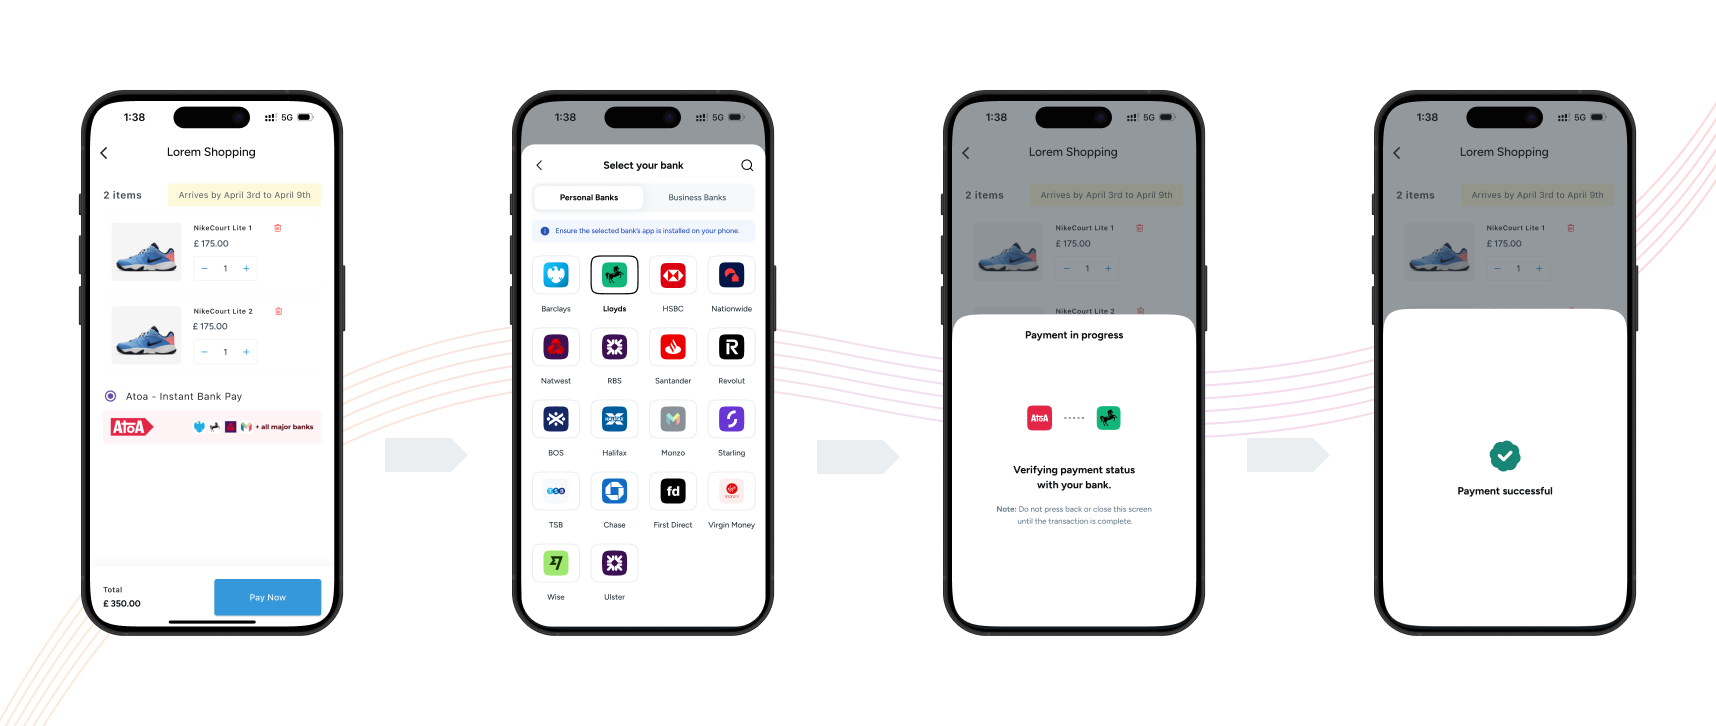
Integrate Atoa into your Flutter app in minutes using our dedicated SDK.
Easily add seamless Pay by Bank payments to new or existing Flutter apps. The SDK is exclusive to Flutter (not native Android/iOS) and available on [pub.dev](https://pub.dev/packages/atoa_sdk), where developers are welcome to contribute and provide feedback.
 ## Prerequisites
Before you start, ensure the following setup is complete:
* Create an Atoa account: Sign up using our Business App or Web Dashboard.
* Generate API keys: Go to API Access inside the Atoa Business App and generate keys for Sandbox (testing) and Production (live).
* Backend readiness: You must be able to create a Payment Request on your backend server using Atoa APIs before calling the Flutter SDK.
See the [Getting Started](/introduction#step-1-sign-up-for-developer-access) guide for more information.
## 1: Install the SDK
Run the following to add the Atoa SDK to your Flutter project
```sh theme={null}
flutter pub add atoa_sdk
```
For usage, sample code to integrate can be found in [Example app](https://github.com/ATOAPaymentsLimited/flutter_atoa_sdk/tree/main/demo_app).
## 2. Import the Package
```dart theme={null}
import 'package:atoa_sdk/atoa_sdk.dart';
```
## 3: Generate a Payment Request (Backend)
You can generate a payment using the [payment-process](/api-reference/Payment/process-payment) API, which must be called from your server while creating an order. Refer to the getting started guide to know more
```sh theme={null}
https://api.atoa.me/api/payments/process-payment
```
```sh theme={null}
curl --location --request POST 'https://api.atoa.me/api/payments/process-payment' \
--header 'Authorization: Bearer {access-secret}' \
--header 'Content-Type: application/json' \
--data-raw '{
"customerId": "",
"orderId": "",
"amount": "",
"currency": "GBP",
"paymentType": "",
"autoRedirect": "",
"consumerDetails": {
"phoneCountryCode": "",
"phoneNumber": ""
}
}'
```
Note: `redirectUrl` can be used to redirect the user back to your app after the payment is completed. Follow the information given in the handle redirection steps below
## 4. Launch the Payment Dialog
After obtaining a valid paymentRequestId, you can now invoke the Flutter SDK’s Pay method to show the checkout experience:
```dart theme={null}
final transactionDetails = await AtoaSdk.pay(
context,
paymentId: 'your-payment-request-id',
showHowPaymentWorks: false,
customerDetails:
// pass customer details for pre-select bank
const CustomerDetails(
phoneCountryCode: '44',
phoneNumber: '8788899999',
email: 'aaa@gmail.com',
),
env: AtoaEnv.prod,
// or AtoaEnv.sandbox
onUserClose: (
{required String paymentRequestId,
Map? redirectUrlParams,
String? signature,
String? signatureHash}) {
// handle payment when user close the payment verification bottom sheet
ScaffoldMessenger.of(context).showSnackBar(
SnackBar(
backgroundColor: RegalColors.darkOrange,
content: Text(
'User closed the payment for paymentRequestId: $paymentRequestId',
),
),
);
},
onPaymentStatusChange: (
{required String status,
Map? redirectUrlParams,
String? signature,
String? signatureHash}) {
// handle payment status
print('Payment Status Changed to $status');
},
onError: (error) {
// handle Atoa Mobile SDK error
print('Error in Atoa Mobile SDK ${error.message}');
},
);
```
Pass `customerDetails` if available. It pre-selects the user's previous bank
for faster checkout.
#### SDK Parameters
| Parameters | Type | Required | Description |
| :-------------------- | :-------------- | :------- | :------------------------------------------------- |
| env | AtoaEnv | Yes | Environment: AtoaEnv.sandbox or AtoaEnv.prod |
| paymentId | String | Yes | Unique payment request ID |
| showHowPaymentWorks | Boolean | Yes | Display onboarding sheet for users |
| customerDetails | CustomerDetails | No | Mobile + Email to fetch last-used bank |
| onError | Callback | Optional | Called on SDK errors |
| onPaymentStatusChange | Callback | Optional | Called when the payment status updates |
| onUserClose | CallBack | Optional | Called when user closes payment verification sheet |
Below are the payload structures you can expect inside each callback:
#### onError
Triggered when an error occurs during the payment process
```dart theme={null}
{
AtoaException error // Error object which contains error message,
}
```
#### onPaymentStatusChange
Triggered when the payment status updates. Handle COMPLETED, PENDING and FAILED statuses.
```dart theme={null}
{
String status, // Current payment status
String? atoaSignature, // Atoa signature for verification (optional)
String? atoaSignatureHash, // Atoa signature hash for verification (optional)
Map? redirectUrlParams, // Additional callback parameters (optional)
}
```
#### onUserClose
Triggered when the user closes the payment verification sheet
```dart theme={null}
{
String paymentRequestId, // The payment request ID
String? atoaSignature, // Atoa signature for verification (optional)
String? atoaSignatureHash, // Atoa signature hash for verification (optional)
Map? redirectUrlParams, // Additional callback parameters (optional)
}
```
## 5. Handle Payment Response
You can handle the payment success, failure, pending and other statuses based on payment response
```dart theme={null}
if (transactionDetails != null) {
if(transactionDetails.isCompleted) {
// handle success
} else {
// handle failure / pending statuses
}
} else {
// Bottom sheet was dismissed
}
```
Sample response can be seen [here](/introduction#step-3-handle-payment-status).
## 6. Handle Redirection (Deep link)
While calling payment-process API to generate a payment, you can specify a redirectUrl in your request body. The redirectUrl, which should be passed as body parameters, redirects to your website and then opens your app via deep linking. This enables users to open your application after payment.
Following the completion of the payment by the customer’s bank app, they will be redirected back to their browser. Atoa will transmit the idempotency id, amount and redirect URL with status as query parameters appended to your specified Redirected URL, forming a URL structure like:
```dart theme={null}
www.yourdeeplink.me?idempotency=ATOA783838728372&redirectUrl=https://pay.me&amount=2
```
Resources For Implementing deep-linking for your app
* [Flutter Docs](https://docs.flutter.dev/ui/navigation/deep-linking)
* [Code With Andrea](https://codewithandrea.com/articles/flutter-deep-links/)
* [Set up App links for Android](https://docs.flutter.dev/cookbook/navigation/set-up-app-links)
* [Set up Universal links for iOS](https://docs.flutter.dev/cookbook/navigation/set-up-universal-links)
### Subscribe to webhook (Recommended)
Atoa uses webhooks to notify your application whenever an event happens in your account. Webhooks are particularly useful for events such as changes in payment status, such as completion, failure, or pending.
To get started, you must [Register your webhook endpoint](/api-reference/Webhook/CreateWebhookEvent) so Atoa knows where to deliver events.
After registration, your endpoint will start receiving detailed webhook payloads. These will inform you of payment status updates, such as `COMPLETED`, `PENDING`, or `FAILED`.
### Store Fields in Server
Store the following in your backend once the transaction is complete.
```sh theme={null}
"signatureHash": string
"paymentIdempotencyId": string
```
## 7. Check Bank App Installation (Android/iOS Requirements)
Our mobile SDK checks if the bank(using for making payments) app is installed or not. For that, you need to add 'queries' tag for android and 'LSApplicationQueriesSchemes' key for iOS
In Android, you need to add 'queries' tag in `AndroidManifest.xml`
```xml theme={null}
```
In iOS, you need to add 'LSApplicationQueriesSchemes' key in `Info.plist`
```xml theme={null}
LSApplicationQueriesSchemes
pulsesecure
launchbmb
lloyds-retail
hsbc-pwnwguti5z
uk.co.santander.santanderUK
fb894703657238109
bos-retail
halifax-retail
monzo
starlingbank
tsbmobile
comfirstdirectbankingonthego
launchFT
virginmoneyimport
ybssavings
transferwise
tg
BOIOneAPP
ie.aib.mobilebanking
bos-commercial
chase-international
```
## 8. Verify Payment Signature
This is a mandatory step to confirm the authenticity of the details returned to the Checkout form for successful payments.
You can verify the signature by doing [this](/introduction#step-4-verify-signature).
## 9: Test in Sandbox
Use the sandbox for testing different flows
```dart theme={null}
final paymentDetails = AtoaSdk.pay(
context,
paymentId: 'your-payment-request-id',
env: AtoaEnv.sandbox,
// other config properties
);
```
Refer to the [Sandbox Guide](/atoa-sandbox) to simulate different outcomes.
## 10: Brand & Customize (Optional)
**Theme Color:** Choose your brand’s hex color in the dashboard. The widget will automatically reflect your theme color. [Update your theme color here](https://dashboard.paywithatoa.co.uk/add-ons/custom-branding)
**Design Guidelines:** Refer to our official branding guide to correctly showcase “Pay by Bank” in your checkout. [View Figma file](/design-system)
**Note:** You do **not** need to pass the theme color in the SDK. Simply configure these once from your Dashboard or Atoa Business App
## 🧠 Tips & Best Practices
✅ To enable faster checkout, Atoa uses the customer’s email and mobile number to pre-select the previously used bank within our network. We recommend passing customer details in the Mobile SDK to support one-click checkout for returning users.
✅ Always validate the payment status using webhooks or polling.
✅ Do not display the payment widget before your backend has successfully created a valid paymentRequestId.
✅ Before going LIVE, ensure to use the production access secret generated from your Business App or Web Dashboard.
✅ Tipping is disabled when using the Mobile SDK. If tipping is part of your experience, we recommend implementing it on your end.
## 📩 Need Help?
If you encounter any issues or need help debugging, please refer to our public [GitHub repository](https://github.com/ATOAPaymentsLimited/flutter_atoa_sdk) for detailed setup instructions.
We’re here to help — email us at [hello@paywithatoa.co.uk](mailto:hello@paywithatoa.co.uk) or chat with us via the dashboard's chat support
## Prerequisites
Before you start, ensure the following setup is complete:
* Create an Atoa account: Sign up using our Business App or Web Dashboard.
* Generate API keys: Go to API Access inside the Atoa Business App and generate keys for Sandbox (testing) and Production (live).
* Backend readiness: You must be able to create a Payment Request on your backend server using Atoa APIs before calling the Flutter SDK.
See the [Getting Started](/introduction#step-1-sign-up-for-developer-access) guide for more information.
## 1: Install the SDK
Run the following to add the Atoa SDK to your Flutter project
```sh theme={null}
flutter pub add atoa_sdk
```
For usage, sample code to integrate can be found in [Example app](https://github.com/ATOAPaymentsLimited/flutter_atoa_sdk/tree/main/demo_app).
## 2. Import the Package
```dart theme={null}
import 'package:atoa_sdk/atoa_sdk.dart';
```
## 3: Generate a Payment Request (Backend)
You can generate a payment using the [payment-process](/api-reference/Payment/process-payment) API, which must be called from your server while creating an order. Refer to the getting started guide to know more
```sh theme={null}
https://api.atoa.me/api/payments/process-payment
```
```sh theme={null}
curl --location --request POST 'https://api.atoa.me/api/payments/process-payment' \
--header 'Authorization: Bearer {access-secret}' \
--header 'Content-Type: application/json' \
--data-raw '{
"customerId": "",
"orderId": "",
"amount": "",
"currency": "GBP",
"paymentType": "",
"autoRedirect": "",
"consumerDetails": {
"phoneCountryCode": "",
"phoneNumber": ""
}
}'
```
Note: `redirectUrl` can be used to redirect the user back to your app after the payment is completed. Follow the information given in the handle redirection steps below
## 4. Launch the Payment Dialog
After obtaining a valid paymentRequestId, you can now invoke the Flutter SDK’s Pay method to show the checkout experience:
```dart theme={null}
final transactionDetails = await AtoaSdk.pay(
context,
paymentId: 'your-payment-request-id',
showHowPaymentWorks: false,
customerDetails:
// pass customer details for pre-select bank
const CustomerDetails(
phoneCountryCode: '44',
phoneNumber: '8788899999',
email: 'aaa@gmail.com',
),
env: AtoaEnv.prod,
// or AtoaEnv.sandbox
onUserClose: (
{required String paymentRequestId,
Map? redirectUrlParams,
String? signature,
String? signatureHash}) {
// handle payment when user close the payment verification bottom sheet
ScaffoldMessenger.of(context).showSnackBar(
SnackBar(
backgroundColor: RegalColors.darkOrange,
content: Text(
'User closed the payment for paymentRequestId: $paymentRequestId',
),
),
);
},
onPaymentStatusChange: (
{required String status,
Map? redirectUrlParams,
String? signature,
String? signatureHash}) {
// handle payment status
print('Payment Status Changed to $status');
},
onError: (error) {
// handle Atoa Mobile SDK error
print('Error in Atoa Mobile SDK ${error.message}');
},
);
```
Pass `customerDetails` if available. It pre-selects the user's previous bank
for faster checkout.
#### SDK Parameters
| Parameters | Type | Required | Description |
| :-------------------- | :-------------- | :------- | :------------------------------------------------- |
| env | AtoaEnv | Yes | Environment: AtoaEnv.sandbox or AtoaEnv.prod |
| paymentId | String | Yes | Unique payment request ID |
| showHowPaymentWorks | Boolean | Yes | Display onboarding sheet for users |
| customerDetails | CustomerDetails | No | Mobile + Email to fetch last-used bank |
| onError | Callback | Optional | Called on SDK errors |
| onPaymentStatusChange | Callback | Optional | Called when the payment status updates |
| onUserClose | CallBack | Optional | Called when user closes payment verification sheet |
Below are the payload structures you can expect inside each callback:
#### onError
Triggered when an error occurs during the payment process
```dart theme={null}
{
AtoaException error // Error object which contains error message,
}
```
#### onPaymentStatusChange
Triggered when the payment status updates. Handle COMPLETED, PENDING and FAILED statuses.
```dart theme={null}
{
String status, // Current payment status
String? atoaSignature, // Atoa signature for verification (optional)
String? atoaSignatureHash, // Atoa signature hash for verification (optional)
Map? redirectUrlParams, // Additional callback parameters (optional)
}
```
#### onUserClose
Triggered when the user closes the payment verification sheet
```dart theme={null}
{
String paymentRequestId, // The payment request ID
String? atoaSignature, // Atoa signature for verification (optional)
String? atoaSignatureHash, // Atoa signature hash for verification (optional)
Map? redirectUrlParams, // Additional callback parameters (optional)
}
```
## 5. Handle Payment Response
You can handle the payment success, failure, pending and other statuses based on payment response
```dart theme={null}
if (transactionDetails != null) {
if(transactionDetails.isCompleted) {
// handle success
} else {
// handle failure / pending statuses
}
} else {
// Bottom sheet was dismissed
}
```
Sample response can be seen [here](/introduction#step-3-handle-payment-status).
## 6. Handle Redirection (Deep link)
While calling payment-process API to generate a payment, you can specify a redirectUrl in your request body. The redirectUrl, which should be passed as body parameters, redirects to your website and then opens your app via deep linking. This enables users to open your application after payment.
Following the completion of the payment by the customer’s bank app, they will be redirected back to their browser. Atoa will transmit the idempotency id, amount and redirect URL with status as query parameters appended to your specified Redirected URL, forming a URL structure like:
```dart theme={null}
www.yourdeeplink.me?idempotency=ATOA783838728372&redirectUrl=https://pay.me&amount=2
```
Resources For Implementing deep-linking for your app
* [Flutter Docs](https://docs.flutter.dev/ui/navigation/deep-linking)
* [Code With Andrea](https://codewithandrea.com/articles/flutter-deep-links/)
* [Set up App links for Android](https://docs.flutter.dev/cookbook/navigation/set-up-app-links)
* [Set up Universal links for iOS](https://docs.flutter.dev/cookbook/navigation/set-up-universal-links)
### Subscribe to webhook (Recommended)
Atoa uses webhooks to notify your application whenever an event happens in your account. Webhooks are particularly useful for events such as changes in payment status, such as completion, failure, or pending.
To get started, you must [Register your webhook endpoint](/api-reference/Webhook/CreateWebhookEvent) so Atoa knows where to deliver events.
After registration, your endpoint will start receiving detailed webhook payloads. These will inform you of payment status updates, such as `COMPLETED`, `PENDING`, or `FAILED`.
### Store Fields in Server
Store the following in your backend once the transaction is complete.
```sh theme={null}
"signatureHash": string
"paymentIdempotencyId": string
```
## 7. Check Bank App Installation (Android/iOS Requirements)
Our mobile SDK checks if the bank(using for making payments) app is installed or not. For that, you need to add 'queries' tag for android and 'LSApplicationQueriesSchemes' key for iOS
In Android, you need to add 'queries' tag in `AndroidManifest.xml`
```xml theme={null}
```
In iOS, you need to add 'LSApplicationQueriesSchemes' key in `Info.plist`
```xml theme={null}
LSApplicationQueriesSchemes
pulsesecure
launchbmb
lloyds-retail
hsbc-pwnwguti5z
uk.co.santander.santanderUK
fb894703657238109
bos-retail
halifax-retail
monzo
starlingbank
tsbmobile
comfirstdirectbankingonthego
launchFT
virginmoneyimport
ybssavings
transferwise
tg
BOIOneAPP
ie.aib.mobilebanking
bos-commercial
chase-international
```
## 8. Verify Payment Signature
This is a mandatory step to confirm the authenticity of the details returned to the Checkout form for successful payments.
You can verify the signature by doing [this](/introduction#step-4-verify-signature).
## 9: Test in Sandbox
Use the sandbox for testing different flows
```dart theme={null}
final paymentDetails = AtoaSdk.pay(
context,
paymentId: 'your-payment-request-id',
env: AtoaEnv.sandbox,
// other config properties
);
```
Refer to the [Sandbox Guide](/atoa-sandbox) to simulate different outcomes.
## 10: Brand & Customize (Optional)
**Theme Color:** Choose your brand’s hex color in the dashboard. The widget will automatically reflect your theme color. [Update your theme color here](https://dashboard.paywithatoa.co.uk/add-ons/custom-branding)
**Design Guidelines:** Refer to our official branding guide to correctly showcase “Pay by Bank” in your checkout. [View Figma file](/design-system)
**Note:** You do **not** need to pass the theme color in the SDK. Simply configure these once from your Dashboard or Atoa Business App
## 🧠 Tips & Best Practices
✅ To enable faster checkout, Atoa uses the customer’s email and mobile number to pre-select the previously used bank within our network. We recommend passing customer details in the Mobile SDK to support one-click checkout for returning users.
✅ Always validate the payment status using webhooks or polling.
✅ Do not display the payment widget before your backend has successfully created a valid paymentRequestId.
✅ Before going LIVE, ensure to use the production access secret generated from your Business App or Web Dashboard.
✅ Tipping is disabled when using the Mobile SDK. If tipping is part of your experience, we recommend implementing it on your end.
## 📩 Need Help?
If you encounter any issues or need help debugging, please refer to our public [GitHub repository](https://github.com/ATOAPaymentsLimited/flutter_atoa_sdk) for detailed setup instructions.
We’re here to help — email us at [hello@paywithatoa.co.uk](mailto:hello@paywithatoa.co.uk) or chat with us via the dashboard's chat support