> ## Documentation Index
> Fetch the complete documentation index at: https://devdocs.paywithatoa.co.uk/llms.txt
> Use this file to discover all available pages before exploring further.
# WooCommerce Payment Integration
> Accept Pay by Bank and card payments in WooCommerce with Atoa. Install the plugin, add your access secret and enable the gateway.
Woocommerce allows you to build and manage own online stores on top of WordPress. Atoa Pay is a payment gateway that allows customers to pay instantly for goods and services through their bank app using Open Banking. It works with all major UK banks.
## Steps to install and integrate Atoa plugin with woo-commerce
### 1. Installing the Atoa Business App
The Atoa Business app serves as the central hub for managing all your payments, APIs, integrations, and access tokens.
To get started, follow the steps below:
* **Download** the Atoa Business app from your device's Play Store or Appstore.
* Sign up with your business details to create an account. If you are new
to Atoa, you must complete the onboarding and Know Your Business (KYB) process
before you can begin using the app.
* Once signed in, access the homepage and locate the store icon on the top-left-hand side.
* Navigate to the settings tab within the app.
* Click on "API Access" to generate either the Production or Sandbox key based on your requirements.
* Simply paste your Homepage URL into the redirect URL field.
The Sandbox environment is exclusively intended for test payments with Atoa.
Refer to the provided Sandbox guide for more detailed information.
### 2 .Downloading and Installing the Atoa WordPress Plugin
Integrate the Atoa WordPress plugin into your e-commerce store by installing the [Atoa - WooCommerce](https://wordpress.org/plugins/atoa-pay/) plugin from the marketplace.
### 3. Setting up Atoa Pay on Your WordPress Account
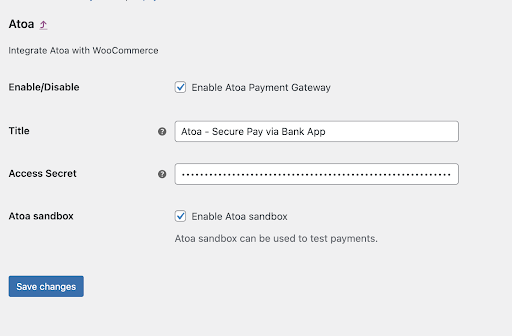 **To set up Atoa Pay:**
* Access Settings or for WooCommerce users, navigate to WooCommerce > Payments > Atoa Pay.
* Click "Manage" and paste the API access key for Production or Sandbox.
Thats it! Atoa is now ready to accept payments. For more help, visit docs.paywithatoa.co.uk or email us at **`hello@paywithatoa.co.uk`**.
If you have enabled [V2 webhook signing](/api-reference/Webhook/v2-signing) in the Atoa Dashboard (**Settings → Webhooks**), paste your signing secret into the plugin's **Webhook Signing Key** field and save. This ensures the plugin can verify incoming webhook deliveries. Without this step, plugin webhooks will fail signature verification after V2 signing is enabled.
**Congratulations! You have now successfully installed the Atoa WordPress plugin, and it is ready for use on your e-commerce store.**
**Atoa Sandbox environment guide**
Refer to atoa [**sandbox guide**](/atoa-sandbox) to simulate different
scenarios, such as successful payments, failed payments, and pending payments.
## Frequently asked questions (FAQs)
**To set up Atoa Pay:**
* Access Settings or for WooCommerce users, navigate to WooCommerce > Payments > Atoa Pay.
* Click "Manage" and paste the API access key for Production or Sandbox.
Thats it! Atoa is now ready to accept payments. For more help, visit docs.paywithatoa.co.uk or email us at **`hello@paywithatoa.co.uk`**.
If you have enabled [V2 webhook signing](/api-reference/Webhook/v2-signing) in the Atoa Dashboard (**Settings → Webhooks**), paste your signing secret into the plugin's **Webhook Signing Key** field and save. This ensures the plugin can verify incoming webhook deliveries. Without this step, plugin webhooks will fail signature verification after V2 signing is enabled.
**Congratulations! You have now successfully installed the Atoa WordPress plugin, and it is ready for use on your e-commerce store.**
**Atoa Sandbox environment guide**
Refer to atoa [**sandbox guide**](/atoa-sandbox) to simulate different
scenarios, such as successful payments, failed payments, and pending payments.
## Frequently asked questions (FAQs)
-
The customer adds items to their cart and proceeds to checkout.
-
At checkout, the customer see a list of payment methods, including{" "}
Atoa.
- The customer selects Atoa and the checkout amount is shown.
-
The customer is then presented with a list of their bank apps.
-
The customer selects their bank app and is securely redirected to their
bank app to complete the payment.
-
{" "}
When a customer pays with Atoa Pay, the funds are sent directly from their
bank account to your merchant account. This means that you will receive the
money in a matter of seconds, not days or weeks.
-
You can easily check all of your payments in the{" "}
Transactions section of your Atoa Business app. This section
shows the payment amount, the date and time the customer made it, and
the customer’s bank account information.
- Atoa charges a flat rate of 0.6% per transaction. There are no monthly charges or setup fees. You can set up a direct debit to pay your transaction fees, or you can pay manually. To check your bill, go to My Account > Billing in the Atoa Business app. You can also manage your direct debit, usage, plan, and billing history in this section.
- Atoa sends bills on the last week of every month. The amount of your bill reflects your pricing plan and usage for the previous month. The invoice amount will be charged to your bank account on the 1st of each month.